Friday, December 30, 2005


Empire City Open 2005


After losing my first two games in the two-day schedule, I re-entered in the one-day schedule with the first three rounds played at G/30. I won my first round game and this position came up in the second round. My opponent figured he had found a brilliant sacrifice that would net him two pawns and a rook for a bishop. He struck with 29... Bd4 . I could, of course, move the rook on C5 and settle for the loss of a pawn. However, upon investigation, it seems my opponent overlooked something! 30. ed, Qd4+ and I countered with 31. Qf2! protecting the king and rook at the same time.

I had only three and a half minutes left on my clock at this point while my opponent had around five to six minutes. It is not that he lost a bishop outright. He came out two pawns ahead on the kingside for it, and more work and time are needed to convert my advantage into a win. So, the position was still unclear. Play continued 31... Qd6 32. Bb3, Qa6 33. Rc6, Qa3 34. Qc5, Qb2 35. Rc7, RbD8 36. Qc3, Qe2 37. Qf3, Qd2 38. Rd1, Qa5 39. RxR, QxR and we agreed to a draw.

Thursday, December 29, 2005


Queen Sac Gone Awry

Here's a position in the last round of the 2005 Empire City Open at the New Yorker Hotel in New York City. Before the round began, I asked my opponent if he intended to play out this game or settle for an early draw so we can head home early. He said that he wanted to play the game, and so we played. We reached this position where I had just played 36... Be4. I thought that this was the killer move that would finally breakdown white's defenses. Mate is threated on G2 and if the rook on F3 moves to G3 the black queen will capture the rook on F1. So, my opponent thought for a short while and with utmost authority plunked his queen on the E7 square, 37. Qe7+ . An incredible move! I was taken aback and my reaction was of an " uh oh, I overlooked a fine move. " It wasnt long till I realized that my opponent was banking on a capture on F7 by the rook on F3 with a check and an attack. This failed on account of 37... Re7 38. fe+, Ke8 and there will not be any life-saving check by
white on the black king. White resigned after a couple more moves.

Tuesday, December 27, 2005


Breakthrough

The position looks dead even, but if White were to move then he can produce a win by deflecting the opposing pawns. This position was set-up to illustrate the technique.

White plays 1. b6, ab 2. c6, bc 3. a6 and the A pawn will promote in two moves. Of course, it could also go 1. b6, cb 2. a6, ba 3. c6. In both cases, the black king is too far to catch up to the pawn. King position is important in this situation and so does the position of the pawn phalanx. The closer the pawn phalanx is to the queening square, the greater the chance for a pawn promotion.


Friday, December 23, 2005


A Choice of Rooks

Quite often, we come to a point where we must choose which rook to move. Here is an example that shows the difference between the rooks. Before I lost this game in the endgame as white, this position came up right off the opening stage. I wanted to chase the black queen off its perch on D4, and played 12. RcD1? Yes, I am assigning a question mark to the move in respect to a golden opportunity that I missed. If I had played 12. ReD1 instead, leaving the rook on C1 to exert its influence on the C file, the black queen would have been trapped. Here's what would have happened, 12... Qc5 ( the only square the left for the black queen ) 13. Nb5! and black queen has no place to hide from the rooks on C1 and D1.


Thursday, December 22, 2005


Deflect and Stretch


This position looks like it came straight out of an endgame manual on rook and pawns endings, but it is an actual position from an online game. So, the highly-regarded chess trainer, Mark Dvoretsky, had nothing to do with this example. He would, however, know exactly what to do with it!

My opponent and I had played on equal basis throughout the game, and a pawn advantage was one of the two good things I can show for my efforts. The other is a positional advantage consisting of a passed C pawn and aggressively placed king and rook. As you know, rook and pawn endings are drawish even if one side has an extra pawn. So, the question is how do you make your extra pawn count. Is it possible to win in this position?


Very often, it is not the passed pawn that ends up being promoted, but another pawn whose advance to the queening square is made possible by exchanging off one advantage for another.

From this position, white played 1. c6+ , and the black king must now relinquish his support for the pawn on e6. He might as well take the C pawn with 1... Kc6 . Now, white picks up the under-defended E pawn by 2. Re6+, Re6+ 3. Ke6. All white has done is to exchange his C pawn for the black's E pawn, resulting in the exchange of the rooks as well. But, white retains a passed pawn in the form of a pawn on e4.

Now, the strategy, or technique is different. White will force black to address the passed E pawn while he goes after the queenside pawns. Black will be stretched between stopping the E pawn and defending his queenside pawns. As the saying goes, something has to give!

Play continued 3... Kc7 4. Kd5, Kd7 5. Kc5, Kc7 6. e5, Kd7 7. Kb6, Ke6 8. Ka6, Ke5 9. Kb5, Ke5 and ultimately white's win will come from his A nd B pawns.


Sunday, December 18, 2005

Vicenzo, The Venetian.


From George Walker's Chess and Chess-players ( London, 1850 ), we learn of Vicenzo di Guagnaro, otherwise referred to as Vicenzo, the Venetian. Described as having a fine face and form, he was a wealthy citizen of Venice, and lived high in its social strata.

On one of the nights of Carnivale, sometime in the 16th century, a grand occassion was held at the Buondelmonte palazzo. A traffic jam of gondolas brought crowds up its marble steps and into " halls of blazing light and beauty. " There, Venice's high society indulged in fun and games. We are told that at that time, chess was at the height of its popularity. Like games of chance although not one of them, chess was often played with high stakes, large amounts of money hung in the balance, fortunes made and lost. One could move up the social and professional ladder if he was known to exhibit great skill in the game.

In the backroom of the palazzo, the 20-yr old Vicenzo looked hopefully at the position before him ( diagram ). With the black pieces, he had reason to be optimistic. Ahead by a bishop and three pawns, the nobleman's material advantage was overwhelming. If that wasn't enough, Vicenzo could also make use of a discovered check when given the opportunity. The D and E pawns are connected and passed, and the same thing can be said about the G and H pawns. In contrast, his opponent's only pawn is isolated and undefended. Altogether, this position gave Vicenzo a great feeling.

At this point in the evening, Vicenzo had already lost " gold, houses and jewel. " Having no more money available, he played on account of his honour and promised to pay tomorrow if he lost the game. If he is unable to pay his debt by morning, he will take his own life. Across the board from Vicenzo sat a masked woman of ivory neck and overall fine appearance. She was, none other, but the owner of the palace, the giver of the feast, the queen of beauty---the Princess del Buondelmonte.

Somewhere in the complicate Venetian world of intrigue, Vicenzo and the Princess del Buondelmonte have become adversaries. There is no love lost between the two. Revenge, hatred, and the need to triumph over the other filled their hearts. It was said that either of them cold drink the heart's blood of the other with a feeling that only Italians could appreciate.

A crowd had gathered around their table to watch the contest. Among them was a fiend described as " not satan in person " but a sort of lesser demon, a " laughing Mephistopheles. " As the game progressed, the players became more tense and tried their best not to let emotions influence their play. The princess needed a miracle, and it was her turn to move. The princess thought hard and long, and despair began to set in. She could not bear to let Vicenzo win this game. It was at this moment that the fiend approached and whispered something in her ear. Immediately, her face lit up and nearly fainted with joy. The princess proceeded to make the moves and checkmated her opponent in 10. Vicenzo, shocked, left the room without saying a word. The princess turned around to embrace and thank the stranger who whispered to her, but found no one there. The guests didnt see anyone either.

The story of Vicenzo goes on for quite a while after this game, but his full story is not my purpose here. The story-teller didnt tell us how the princess won the game. The only clue is that it took 10 moves, assuming that black put up the best defense, to declare checkmate. Remember, it was such a horrible position that only the devil could find a way to victory. After some investigation, it has become clear to me that the princess must have played the fiendish 1. Qa2+!!!.

I offer the following variation using a zigzagging technique:


1... Kf8 2. Qa3+, Kg8 [ black must avoid 2... Ke8 because of 3. Qe7# ] 3. Qb3+, Kf8 4. Qb4+, Kg8 5. Qc4+, Kf8 6. Qc5+, Kg8 7. Qd5+, Kf8 8. Qd8+, Kf7 9. Qe7+, Kg8 10. Qg7#.

This must have been the line that the princess followed. Variations where the black king plays to the corner at H8 or towards the middle at E8 lead to faster checkmates.


Saturday, December 17, 2005


Let's talk about blunders. Actually, make that gross blunders. Yes, I am referring to those moves that defy any explanation or justification. Some of us castle into a direct attack, move the queen to a square where she is en prise, allow obvious pawn and knight forks, or get our major pieces painfully skewered by the opposing bishop. Oh Lord, please help us in our hour of need! Some players pass them off as sacrifices so deeply calculated that their real intention will become clear much later in the game. Only one person would enjoy this kind of stuff, the opponent!

Okay, so we feel very bad about gross blunders. We begin to question our analytical ability, our future in chess, our capacity for improvement, and whether we should just give it up and pursue another endeavour. You know what I mean.

Let's take an example from the " Magician from Riga, " Mikhail Tal. From his book, The Life and Times of Mikhail Tal, we have the position shown above. If it looks a little odd, it is because Tal could not remember the exact position and so set up the pieces just to illustrate the mechanism of his folly. It's black's move and Tal, playing black, was offered a draw by Averbakh. In his own words, Tal looked at the position and realized that he had to defend against the threat of 1. Bh7+ followed by 2. Qd5. He decided to play on and played 1... h6 ???

Although this occurred in a lightning tournament ( Bled, 1959 ), it is still remarkable for a player of Tal's calibre to make such an absurd move. He, in fact, proceeded to win the tournament in spite of this very deep sacrifice. Perhaps, great mental lapses are part and parcel of genius. Let's just leave at that.


December, 2005

The Lucena Position

Named after Luis Ramirez Lucena, author of a 15th century chessbook, this position's place in chess theory is as fundamental to chess as arithmetic is to our primary education. This position, however, does not appear in Lucena's work entitled, Repeticion de Amores e Arte de Axedres ( 1497 ). The Lucena deals with pawn promotion, the placement of rooks, the coordination between pieces, the importance of king position, and the usual exceptions when dealing with the A and H files.

Let's enumerate the salient points of this position:

  1. White is a pawn up. The pawn is passed and already on the seventh rank.
  2. The white king is in the way of the pawn. He needs to get off the queening square to make the promotion possible.
  3. The black rook is standing guard. It will attack the white king as soon as he steps into the open.
  4. The black king is also standing by, ready to help prevent the pawn promotion or even make its capture a possibility.
  5. The white rook is behind the passed pawn, though not directly, but it could be put to better use. Providing cover for the white king will be its role.

The climb to the summit begins with white pushing the black king away from the action by 1. Rd1+, Ke8. Now, there are two files separating the black king and the passed pawn. It will take the black king two moves just to have influence on the passed pawn and its queening square. In many rook and pawn endings, cutting off the king from the action is what makes the win possible.

Since it has been determined that the white rook will provide cover for the king, the question is where to put it. I have seen a rule of thumb that suggests, " to determine the queening square and count 5 ranks back. "

Let's give it a try with 2. Rd4, Ra1. Black is waiting. Play continues 3. Kc7, Rc1+ 4. Kb6, Rb1+ 5. Kc6 ( still protecting the pawn ), Rc1+ 6. Kb5 ... At this point, white is too far to support his pawn from attack but all is according to plan. The black king is still cut off from the action by the white rook. The play goes on 5... Rb1+ , and it seems that the pawn will be lost. Not really. White swings over his rook 6. Rb4 to negate the check and provide the necessary cover for the pawn to queen. The black king has now been released from his containment, but he is one square too far to harass the pawn, the point of white first move 1. Rd1+ . Black may continue with 6... Rb4+ 7. Kb4 ... , but black cannot stop the pawn from promoting. White wins.

The technique employed by white has been compared to " building a bridge. " This winning method does not apply when the passed pawn is on the A file or the H file. Otherwise, you can apply the technique when the passed pawn is anywhere from the B to G files.

There is, however, another exception to the rule. This pertains to the placement of the defending rook. If there are three files separating the defending rook and the attacking king, then this bridge-building will fail and the pawn will be lost if black plays correctly. Generally speaking, the three-file spread will allow the defending rook to attack the king from the side. When the king responds by approaching the rook ( to capture it or stop the checks ), the rook will swing across the three files and attack the passed pawn from behind. The attacking king would be too far and too slow to cover the same distance. I will leave that to you to figure out.

Friday, December 16, 2005


December, 2005

With a Fighting Spirit, A Comeback Win.

This game took place online with a time control of G/10. Yes, it is still considered a blitz game although it allows the players more time to contemplate their moves as compared to the very popular G/5. A time control of G/10 blends intuitive play with some hard, over-the-board analysis. If the game goes the full measure, the total amount of time spent playing will be twenty minutes, not too short nor is it too long.

So, what about this game? Well, a tremendous amount of material is about to disappear from the board. Let's assess the position. Both sides have a bishop pair, but black's pair is beautifully placed on attacking diagonals. They bear down unmercifully on the white king's castled position. The black queen is a menacingly poised on H5, forming a mate-in-one threat on H2 in conjunction with the bishop on D6. To make things worse for white, while this mating threat begs for immediate attention, his queen on G8 is also under attack from the black rook. Even white's rook on D1 is threatened by the black bishop on F3. Multiple threats, how does white deal with them? Take note that the black king is in relative safety on the queenside, behind a wall of pawns. Surely, decisive action is about to occur on the kingside.

Playing with the white pieces, I could have declared a national state of emergency and not be found guilty of fraud and inciting a riot . There is enough here to make a grown man cry.

Instead...

From the jaws of defeat, I began my counter-attack with a lighting bolt on the queenside--- 24. Rb6+ !!!, sacrificing a rook for counter-play and wresting the initiative from black. My opponent responded with 24... Kb6. This continuation, I felt, presented more opportunities for white to continue the counter-attack than 24... cb. The game went on 25. Rb1+, Ka7. Black could have gone 25... Ka5 after which 26. Bd2+, Ka4 27. Qb3# is decisive. White continued 26. d5+, c5. If instead 26... Ka8, then 27. Qd8#.

Here, if white chose to capture en passant with 27. dc6+ , black would have lost anyway after 27... Ka8 28. Qd8+, Bb8 29. Qb8#. On the other hand, if black went 27... Bc5, then 28. Qg7+, Rd7 29. Qd7+, Ka8 30. Qb7#. So, there are several winning lines for white.

However, the game continuation allows for a wonderful gift-giving, or blood-letting if you prefer the half-empty glass, and that began with 27. Qg7+, Qf7 28. Qf7+, Be7 29. Qe7+, Re7 30. Qe7+. Having nothing more to offer, black continued with 30... Ka8 and finally the end came with 31. Qb7#


Thursday, December 15, 2005


November, 2005

A Mental Glitch, A Master Scalp

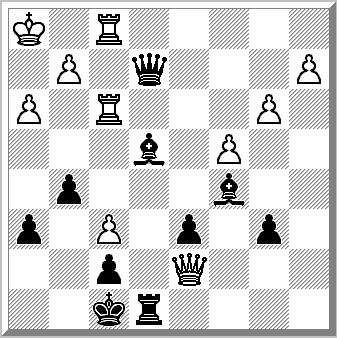
Playing at a local club in New Jersey, I reached this position from a Slav Defense that had gone tactical very early in the game. I had the black pieces and time control was set at G/90. A closed, positional game usually arises from a Slav Defense, but my opponent's early pawn-grabbing opened up the queenside for some active play. The white king castled long, and it is on its original square only because black's queenside attack of queen and rook chased it back there.

At this point, the 20th move and only 15 minutes on our clocks, our game began to attract the attention of a few kibitzers and fellow competitors. Much to the displeasure of my master-rated opponent, they hovered over our board, stroked their chins in contemplation, and scratched their heads in disbelief. They gawked at this most unsettling picture. Indeed, it was obvious that an upset was brewing on board 5. In fact, in this position, barring any gross blunder by black, white is already lost. The attention embarrassed my opponent considering that I was rated only at 1700. A player rated 300 points above his opponent is expected to win hands down everytime. In this match-up, the point spread was 500. That meant that I had no practical chance of beating him, but chess is full of theories and moments of ooops and uh ohs. Once in a while, the fickle finger of fate allows the tail to wag the dog and the bear to trap the hunter. It is not pure conjecture when I say that my opponent underestimated me, for he made his moves quickly. Clearly, he was impatient to make true the foregone conclusion that he will win.

If being at the losing end of an upset was disconcerting to the master, then missing a forced mate was equally disappointing to me. Black was threatening mate at D2. White played the desperate 20. Be2 ( diagram ) to make room for his king's escape. I had seen this move in my analysis and even calculated that it would lead to a forced mate. Thus, 20. Be2 was a losing move, and I made a mental note of it. The queen move 20. Qd1 would lose immediately to 20... Qf2#. Alternatively, 20. Nf3, attacking the black queen and protecting the D2 square, also fails against 20... Qf2+ 21. Kd1, Rb1#. These two continuations underscore how desperate white's position has become, only a ground-shaking, heart-stopping, gross blunder by black could turn the table around. If tactics dont get the job done, then black's passed C pawn would have put on a strangulating squeeze on white. White neglected to develop his pieces, spending his valuable tempi going after a mere pawn. In the position shown, he is actually a pawn down instead of a pawn up. A reversal of fortune, as some might put it.

But in the world of mental notes and electrical brain messages, there is also shortcircuitry. I refer to this phenomenon in the most mundane term---forgetfulness. Those who are in their middle-ages are prone to bouts of forgetfulness. Forgetting a line of analyses, allowing one's attention to be diverted, and not re-checking a previous calculation are all signs of acute dementia. However, more realistically, my problem with short-term memory is to blame. I can remember things quite well if they are distant enough in time, but a phone number or address put to memory 5 minutes ago will be lost forever.

Anyway, let's go back to the game. I played 20... Qc3+ 21. Kf1, Rb1+ 23. Bd1, Qd2 24. g3, Rd1+ 25. Kg2, Qd5+ and white resigned. As you can see, the line I chose was good enough to close the deal but there is the matter of efficiency. It was not the most efficient way to win. That brings us back to the line that leads to a mate by force. Again, from the position shown, 20...Qd2+, 21. Kf1, Rb1+ 22. Bd1, Rd1+ 23. Qd1, Qd1#

Understandly, my opponent left the playing hall in a huff although he resigned with grace and made no attempts at mitigating his loss nor demeaning my win. Till the next time...